
HTML5 Gallery Installation Guide
- Installation - Quick Start
- Add Video to Gallery
- Upgrade to Commercial License
- Convert Video to HTML5 Compatible Format
- Responsive, Skin, Size and Background
- Setup Auto Slideshow and Play Randomly
- Add YouTube Video
- Add Vimeo Video
- Lightbox Popup
- Image and Video Toolbox
- Carousel and Thumbnails
- Title
- Configure as an HTML5 Video Player
- Setup Google Analytics Event Tracking
- Configure Social Media
- XML Playlist
- Setup Google Web Fonts
- Watermark Branding
- Customize Default Skin
- Customize Vertical Skin
- Customize Light Skin
- Customize Horizontal Skin
- Customize Mediapage Skin
- Events
Advanced Tutorials
- How to create a fully responsive photo and video gallery
- How to further customize HTML5 Gallery skin with CSS
- How to read play list dynamically from PHP web service
- How to initialize the HTML5 Gallery after the web page is loaded
- How to create an HD video player
Installation - Quick Start
Installation of HTML5 Gallery is extremely simple and straightforward.
1. Download the HTML5 Gallery Free Version.
2. Unzip the package, upload the folder html5gallery to your web server.
3. Reference the file jquery.js and html5gallery.js which is in the folder html5gallery before the </head> of your web page. If you already have a jQuery script in your web page, you need to add html5gallery.js after your jQuery file. The minimum required version of jQuery is 1.6.
<script type="text/javascript" src="html5gallery/jquery.js"></script>
<script type="text/javascript" src="html5gallery/html5gallery.js"></script>
If your website already has a jQuery, do not add the jquery.js line, only add the html5gallery.js AFTER the existing jquery on your webstie:
<script type="text/javascript" src="html5gallery/html5gallery.js"></script>
4. Add a div with class html5gallery to your webpage where you want to display the Gallery. Define the size of the Gallery with HTML5 tag data-width and data-height. To hide all images before the Gallery is loaded, set the div's style to style="display:none;"
<div class="html5gallery" data-width="480" data-height="270" style="display:none;">
</div>
5. Add images to this div to make a Gallery. The thumbnail is specified in the img tag, the full size image is defined in href attribute of the surrounded a tag. The title is defined in alt attribute of img tag.
<div class="html5gallery" data-width="480" data-height="270" style="display:none;">
    <a href="images/Trees_large.jpg"><img src="images/Trees_small.jpg" alt="Trees"></a>
    <a href="images/Island_large.jpg"><img src="images/Island_small.jpg" alt="Island"></a>
    <a href="images/OperaHouse_large.jpg"><img src="images/OperaHouse_small.jpg" alt="Opera House"></a>
</div>
6. In the HTML5 Gallery, the href value in <a> tag goes to the large image in the slideshow. If you want to add a clickable link to the image, you need to use data tag link and linktarget, for example:
<div class="html5gallery" data-width="480" data-height="270" style="display:none;">
    <a href="images/Trees_large.jpg" data-link="http://html5box.com" data-linktarget="_blank" ><img src="images/Trees_small.jpg" alt="Trees"></a>
</div>
7. Your Photo Gallery is ready to go, you can now open your webpage in a web browser to test the HTML5 Gallery.
Add Video to Gallery
Add videos to the Gallery is straightforward and is exactly the same way as Add Images to Gallery. You can display videos and still images in same Gallery.
The following codes add two video clips to the Gallery. The thumbnail is specified in the img tag, the video source is defined in href attribute of the surrounded a tag. The title is defined in alt attribute of img tag. You can also add a poster image for the video with tag data-poster.
To add a high quality mp4/m4v video file, use data tag data-hd.
To add a webm video for Firefox HTML5 player, you can use tag data-webm. To add a high quality webm video, use data tag data-hdwebm. If webm video are not provided, it will use Flash player to play mp4/m4v file in Firefox.
The normal quality video will be played as default. To configure the HD video as default, add a data tag data-hddefault="true" to the gallery div.
<div class="html5gallery" data-width="480" data-height="270" style="display:none;">
    <a href="images/Big_Buck_Bunny_1.m4v"><img src="images/Big_Buck_Bunny_1.jpg" alt="Big Buck Bunny 1"></a>
    <a href="images/Big_Buck_Bunny_1.m4v"><img src="images/Big_Buck_Bunny_2.jpg" alt="Big Buck Bunny 2"></a>
    <a href="images/Big_Buck_Bunny_1.m4v" data-poster="images/Big_Buck_Bunny_1_1024.jpg"><img src="images/Big_Buck_Bunny_1.jpg" alt="Big Buck Bunny 1"></a>
    <a href="images/Big_Buck_Bunny_1.m4v" data-webm="images/Big_Buck_Bunny_1.webm"><img src="images/Big_Buck_Bunny_2.jpg" alt="Big Buck Bunny 2"></a>
</div>
To play video on mobile and tablet devices, the format of your video files must be be Flash and HTML5 compatible. For how to convert your video files, see Convert Video to HTML5 Compatible Format.
To create an HD video player, you can view the tutorial How to create an HD video player.
Upgrade to Commercial License
HTML5 Gallery Commercial Version is free from HTML5Box.com branding and you can use your own logo. To upgrade to Commercial Version:
1. Make your payment at http://html5box.com/order.php
2. Once your payment is completed, your account information will be sent to your email address in minutes. Log in the Members Area and download the Commercial Version.
3. To upgrade an existing Gallery, overwrite the html5gallery.js with the Commercial Version.
Convert Video to HTML5 Compatible Format
To play with HTML5, the format of your video file must be HTML5 compatible.
HandBrake is an open source, GPL-licensed application for encoding MP4 video. It works on Windows, Linux and Mac.
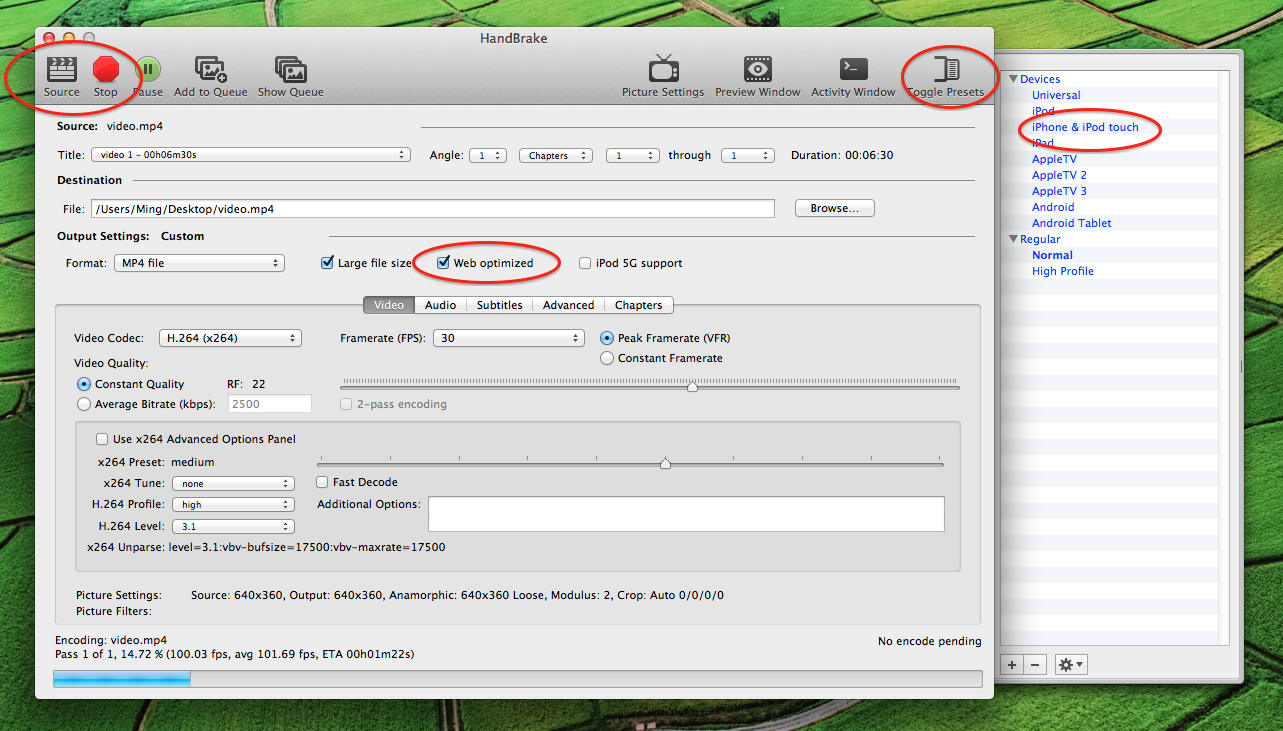
HandBrake comes with a graphic interface which makes it very easy to use. After you open HandBrake, click Source button on the main toolbar and choose a video file. On the right side, there is a list of Presets, you can choose the option iPhone & iPod Touch.
Make sure you also check the option "Web Optimized". The option is also known as "Fast start" or "Progressive downloading". It will place the container header at the start of the file, and allow your video to start playing while it's still downloading.
Click Start and wait for the encoding complete, the converted video file is ready to go.
Responsive, Skin, Size and Background
Thanks to HTML5, we can now use HTML5 data tag to setup all parameters of the Gallery. Since HTML5 data tag is pure HTML code, it will be much easier than using JavaScript, especially when you are integrating the gallery to a CMS system.
The data attribute name must be prefixed with data-, and it should not contain any uppercase letters. The value should be a string. For example, to configure the skin of the gallery to vertical, we can add a data attribute to the div: data-skin="vertical" .
The following code will configure the Gallery to use the Vertical Skin. The image width will be 400, the height will be 225. An online demo is at Vertical Skin Example.
<div class="html5gallery" data-skin="vertical" data-width="400" data-height="225" style="display:none;">
    <a href="images/Waves_1024.jpg"><img src="images/Waves_256.jpg" alt="Waves"></a>
    <a href="images/Big_Buck_Bunny_1.m4v"><img src="images/Big_Buck_Bunny_1.jpg" alt="Big Buck Bunny 1"></a>
</div>
From version 3.1, the HTML5 Gallery became fully responsive.
To configure the HTML5 Gallery as responsive, you only need to add a data tag to the div:data-responsive="true". When this option is on, the gallery will adjust its width to the full width of its parent container, and change its height according the aspect ratio of the default width and height.
Another option for responsive design is responsivefullscreen. This option is only valid when the option responsive is true.
If the option responsive is true, but responsivefullscreen is false, the gallery will change its width to the width of its parent container, but change its height according to the aspect ratio of the default width and height.
-
If both options are true, the gallery will change its width and height to the size of its parent container.This option is useful if you want to create a fullscreen photo and image gallery.
The supported parameters of skin, size and background include:
| Name | Description | Default value |
|---|---|---|
| skin | set up the skin name | horizontal. The version 4.6 supports 7 skins:darkness, light, vertical, showcase, horizontal, gallery, mediapage |
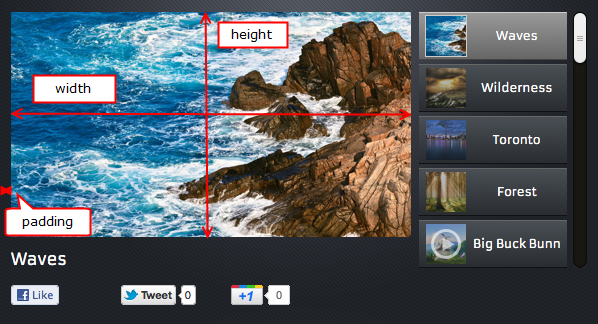
| width | width of image display area | 480. This is the size of the image display area, not the size of the whole gallery. The size of the gallery is decided by the size of image and carousel. |
| height | height of image display area | 270 |
| resizemode | resize mode of image | fill . There are two options fit and fill. |
| padding | padding around the gallery | 12 |
| bgcolor | background color of the gallery | #444444. This option will be ignored if the parameter bgimage is configured. To enable this parameter, you need to configure bgimage as a null string. |
| bgimage | background image of the gallery | background.jpg. The background image must be located inside the folder html5gallery/skins/(skinname). |
| responsive | configure the HTML5 gallery as fully responsive | false The HTML5 Gallery will be fully responsive if this option is configured as true: The gallery will adjust its width to the full width of its parent container, and change its height according the aspect ratio of the default width and height. |
| responsivefullscreen | configure the HTML5 gallery to expand itself to the width and height of its parent container | false. This option is only valid when the option responsive is true.
|
Setup Auto Slideshow and Play Randomly
| Name | Description | Default value |
|---|---|---|
| autoslide | automatically play slideshow | false. The slideshow will automatically play on startup if this parameter is set to true. When autoslide is true, the video will also automatically play on startup. |
| autoplayvideo | automatically start playing video | true |
| html5player | Set HTML5 video player as perferrable | true. When HTML5 is supported by the web browser and the corresponding video format is provided, HTML5 Gallery will use HTML5 video player, otherwise, it will fallback to Flash player |
| defaultvideovolume | Configure the default video volume (from 0 to 1) | 1 |
| slideshowinterval | time interval (ms) between two slides | 6000 |
| random | randomly play slideshow | false |
| loop | loop play times | 0 When the value is 0 and autoslide is true, the slideshow will loop forever. To set the slideshow only play once then stop, add a data tag: data-loop="1" |
| effect | transition effects of slideshow | fade, crossfade, slide To apply multiple effects, use data tag data-effect="fade,crossfade,slide" |
| duration | duration of fade and crossfade effects | 1500 |
| easing | easing effect | easeOutCubic |
| slide | duration and easing of slide effect | {duration:1000,easing:"easeOutCubic"} |
| showtimer | show line timer on the bottom of image when slideshow mode is on | true |
Version 1.0 supports two transition effects:
fadeOut: The current image fades out totally before the next image fades in.
fade: The current image fades out and the next image fades in simultaneously.
You can set up two effects with data-transitioneffect="fadeOut,fade". The gallery will choose one effect randomly for each animation.
The following gallery will automatically and randomly slideshow the images.
<div class="html5gallery" data-autoslide="true" data-random="true" data-width="400" data-height="225" style="display:none;">
    <a href="images/Waves_1024.jpg"><img src="images/Waves_256.jpg" alt="Waves"></a>
    <a href="images/Island_large.jpg"><img src="images/Island_small.jpg" alt="Island"></a>
    <a href="images/OperaHouse_large.jpg"><img src="images/OperaHouse_small.jpg" alt="Opera House"></a>
</div>
Add YouTube Video
Adding YouTube to the gallery is very easy, just like adding an image or a local video.
The following codes add a YouTube video to the Gallery. The thumbnail is specified in the img tag, the video source is defined in href attribute of the surrounded a tag. The title is defined in alt attribute of img tag.
<div class="html5gallery" data-width="400" data-height="225" style="display:none;">
    <a href="http://www.youtube.com/embed/YE7VzlLtp-4"><img src="http://img.youtube.com/vi/YE7VzlLtp-4/2.jpg" alt="Big Buck Bunny - Youtube Video"></a>
</div>
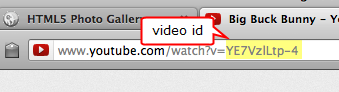
The format of a YouTube video source should behttp://www.youtube.com/embed/VIDEO_ID. You can find the VIDEO_ID from the web browser address bar.
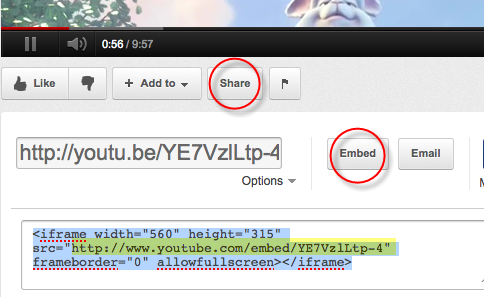
You can also click the button Share, then click Embed, and directly copy the src value from the HTML code.
Each YouTube video comes with four images:
http://img.youtube.com/vi/VIDEO_ID/0.jpg
http://img.youtube.com/vi/VIDEO_ID/1.jpg
http://img.youtube.com/vi/VIDEO_ID/2.jpg
http://img.youtube.com/vi/VIDEO_ID/3.jpg
The image http://img.youtube.com/vi/VIDEO_ID/0.jpg is a full size image, the other three are thumbnails.
Lightbox Popup
By default, the gallery will open the lightbox popup when clicking on the full screen button. To open the image in lightbox popup when clicking on the image itself, you can use data tag data-lightbox="true". For example:
<div class="html5gallery" data-lightbox="true" data-width="480" data-height="270" style="display:none;">
    <a href="images/Trees_large.jpg"><img src="images/Trees_small.jpg" alt="Trees"></a>
    <a href="images/Island_large.jpg"><img src="images/Island_small.jpg" alt="Island"></a>
    <a href="images/OperaHouse_large.jpg"><img src="images/OperaHouse_small.jpg" alt="Opera House"></a>
</div>
You can also add a class name html5gallerylightbox to each a tag. For example:
<div class="html5gallery" data-width="480" data-height="270" style="display:none;">
    <a href="images/Trees_large.jpg" class="html5gallerylightbox"><img src="images/Trees_small.jpg" alt="Trees"></a>
    <a href="images/Island_large.jpg" class="html5gallerylightbox"><img src="images/Island_small.jpg" alt="Island"></a>
    <a href="images/OperaHouse_large.jpg" class="html5gallerylightbox"><img src="images/OperaHouse_small.jpg" alt="Opera House"></a>
</div>
Add Vimeo Video
The following codes add a Vimeo video to the Gallery. The thumbnail is specified in the img tag, the video source is defined in href attribute of the surrounded a tag. The title is defined in alt attribute of img tag.
<div class="html5gallery" data-width="400" data-height="225" style="display:none;">
<a href="https://player.vimeo.com/video/1084537?title=0&byline=0&portrait=0"><img src="images/Big_Buck_Bunny_3.jpg" alt="Vimeo Video"></a>
</div>
To get the URL address of a Vimeo video, click Embed on top of the video and copy the src value from the iframe embed code. There is not a direct address of the video image, you can use a local image as the thumbnail.
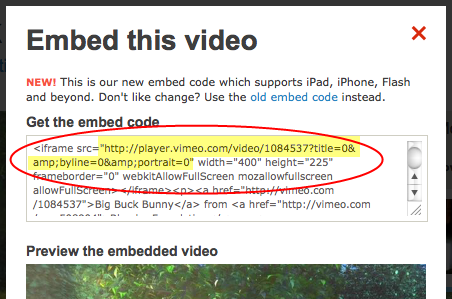
Image and Video Toolbox
When moving mouse over a slide, a toolbox will show up. For an image, there are four buttons on the toolbox. For a video, there are three buttons.


| Name | Description | Default value |
|---|---|---|
| showimagetoolbox | configure show up of toolbox | always There are three options: |
| imagetoolboxstyle | define image toolbox style |
There are two options: |
| showplaybutton | show play button | true |
| showprevbutton | show previous button | true |
| shownextbutton | show next button | true |
| showfullscreenbutton | show fullscreen button | true |
To configure the toolbox showing up for both videos and image, we can add a data attribute to the div data-showimagetoolbox="always".
<div class="html5gallery" data-showimagetoolbox="always" data-width="400" data-height="225" style="display:none;">
     <a href="images/Waves_1024.jpg"><img src="images/Waves_256.jpg" alt="Waves"></a>
     <a href="images/Island_large.jpg"><img src="images/Island_small.jpg" alt="Island"></a>
</div>
Carousel and Thumbnails
You can customize the carousel and thumbnails with HTML5 data tag. For skin related carousel and thumbnails configuration, you can visit Configure Default Skin and Configure Vertical Skin.
| Name | Description | Default value |
|---|---|---|
| showcarousel | show carousel | true |
| carouselbgtransparent | This options will force the background of carousel to transparent. | true for Skin Light |
| carouselmargin | margin between carousel and image show area | 8 |
| thumbwidth | thumbnail width | 48 for Skin Default 148 for Skin Vertical |
| thumbheight | thumbnail height | 48 |
| thumbgap | distance between two thumbnails | 4 |
| thumbmargin | margin around thumbnails area | 6 |
| thumbimagebordercolor | color of image border | #cccccc |
| thumbshowplayonvideo | show a small play button on thumbnail if the item is a video | true |
The following code will hide carousel and set up the width and height of thumbnail as 60.
<div class="html5gallery" data-width="480" data-height="270" data-showcarousel="false" data-thumbwidth="60" data-thumbheight="60" style="display:none;">
    <a href="images/Trees_large.jpg"><img src="images/Trees_small.jpg" alt="Trees"></a>
    <a href="images/Island_large.jpg"><img src="images/Island_small.jpg" alt="Island"></a>
    <a href="images/OperaHouse_large.jpg"><img src="images/OperaHouse_small.jpg" alt="Opera House"></a>
</div>
Title
You can place the title bar above or below the image display area, you can also show or hide the titlr bar, set up its height and define the text style with css.
| Name | Description | Default value |
|---|---|---|
| titleoverlay | overlay title on top of image and video | true |
| titleautohide | auto hide title bar | true |
| headerpos | position of the title bar | bottom |
| showtitle | show or hide title bar | true |
| shownumbering | show order of current slide in the whole gallery | false |
| numberingformat | the format of the numbering string. %NUM will be replaced with the order of current slide, %TOTAL will be replaced with the number of slides. | "%NUM / %TOTAL " |
| titleheight | height of title bar | 45 |
| titlecss | define text style of title | {color:#ffffff; font-size:16px; font-family:Armata, sans-serif, Arial; overflow:hidden; white-space:nowrap;} |
| titlecsslink | defint style of links in title | a {color:#ffffff;} |
| titlefullscreencss | defint text style of title in the LightBox window | {color:#333333; font-size:16px; font-family:Armata, sans-serif, Arial; overflow:hidden; white-space:nowrap; line-height:40px;} |
| titlefullscreencsslink | define styles of links in title in the LightBox window | a {color:#333333;} |
Configure as an HTML5 Video Player
If you have only one video file, you can use HTML5 data tag to configure HTML5 Gallery, and make it a single video player. A demo player can be viewed at Demo Video Player.
<div class="html5gallery" data-width="480" data-height="270" data-src="images/Big_Buck_Bunny_1.m4v" data-title="Big Buck Bunny - Copyright Blender Foundation" style="display:none;"></div>
In the above code, we set up the class of the div to html5gallery, set up the video URL with data-src, configure the title with data-title, set up its size with data-width and data-height, the video player is ready to go.
Setup Google Analytics Event Tracking
HTML5 Gallery has built-in support for Google Analytics. All you need to is to configure your account id in the HTML5 data tag, then you can view how many times your images and videos have been visited.
The following code sets up the Google Analytics account id to UA-29319282-1 by using HTML5 data tag data-googleanalyticsaccount="UA-29319282-1".
<div class="html5gallery" data-width="480" data-height="270" data-googleanalyticsaccount="UA-29319282-1"  style="display:none;">
    <a href="images/Trees_large.jpg"><img src="images/Trees_small.jpg" alt="Trees"></a>
    <a href="images/Island_large.jpg"><img src="images/Island_small.jpg" alt="Island"></a>
    <a href="images/OperaHouse_large.jpg"><img src="images/OperaHouse_small.jpg" alt="Opera House"></a>
</div>
To view the logging data, log into your Google Analytics account, then go to the Standard Reporting.
On the left navigation bar, go to Content -> Events.
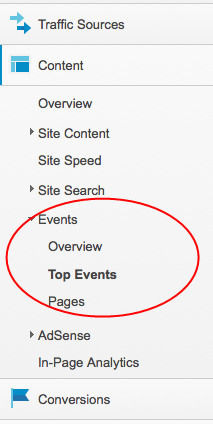
In the Events area, you can view how many times images have been visited and how many times videos have been played, you can also find how many times a play event or an error event has been occurred. In the Event Label, you can find the statistics of each image or video.
Google Analytics also shows the visiting statistics of web page where the Gallery is in.
Configure Social Media
HTML5 Gallery integrates built-in support for Facebook Like button, Twitter Tweet button and Google +1 Button.
The Social Media Bar will be displayed below Title Bar. The position is configurated by the parameter headerpos.
The height of Social Media Bar is configured by parameter socialheight. You can set up a different URL with parameters facebooklikeurl, twitterurl, googleplusurl. If these parameters are not set up, HTML5 Gallery will use current URL address for social media bookmark.
If parameter socialurlforeach is set to true, HTML5 Gallery will add a parameter html5galleryid=XXXto the end of the bookmarked URL. In this way, when a user clicks the link and go to your webpage, the Gallery will directly go to the specified image or video.
The list of all social media parameters are as following:
| Name | Description | Default value |
|---|---|---|
| showsocialmedia | whether to show social media bar | true |
| socialheight | the height of social bar | 30 |
| socialurlforeach | set up a unique link for each image or video | false |
| showfacebooklike | show Facebook Like button | true |
| facebooklikeurl | URL of Facebook Like | "" |
| showtwitter | show Twitter Tweet button | true |
| twitterurl | URL for Twitter Tweet | "" |
| twitterusername | Username of your Twitter account | "" |
| showgoogleplus | show Google +1 button | true |
| googleplusurl | URL for Google +1 | "" |
XML Playlist
Using XML allows you to define a playlist of images and videos outside of the HTML file. An XML file is actually a text file, the format of the XML file is as following:
<playlist>
<slide>
<file>images/Trees_large.jpg</file>
<thumbnail>images/Trees_small.jpg</thumbnail>
<title>Trees</title>
<link><![CDATA[http://html5box.com]]></link>
<linktarget>_blank</linktarget>
</slide>
<slide>
<file>images/Big_Buck_Bunny_1.m4v</file>
<thumbnail>images/Big_Buck_Bunny_1.jpg</thumbnail>
<title>Big Buck Bunny</title>
</slide>
<slide>
<file>http://www.youtube.com/embed/YE7VzlLtp-4</file>
<thumbnail>http://img.youtube.com/vi/YE7VzlLtp-4/2.jpg</thumbnail>
<title>Big Buck Bunny - YouTube</title>
</slide>
<slide>
<file>https://player.vimeo.com/video/1084537?title=0&byline=0&portrait=0</file>
<thumbnail>https://player.vimeo.com/video/1084537?title=0&byline=0&portrait=0</thumbnail>
<title>Big Buck Bunny - Vimeo</title>
</slide>
</playlist>
The <file> is the path to the large image file or linked video address, to specify an extra video format for Firefox HTML5 player, you can use tag <file-webm> or <file-ogg>.
The <thumbnail> is the address of thumbnail image, the <title> is self-explanatory.
If you want to display a longer text, you can add a field <information>. If <information> is added, <title>will be displayed as text on thumbnail, and <information> will be displayed as text under or above image.
The <link> is URL address of the link. Since there are special characters in a URL address, you need to use <![CDATA[ and ]]> to wrap it. The <linktarget> defines the target of the link.
There are two parameters for external XML playlist file:
| Name | Description | Default value |
|---|---|---|
| xml | the address of XML file | "" If you are using a relative address, the path is related to the current web page. |
| xmlnocache | do not cache XML file | true |
The following gallery will read play list from the XML file "player.xml" which is at the same directory of current web page.
<div class="html5gallery" data-width="480" data-height="270" data-xml="player.xml"  style="display:none;">
</div>
Setup Google Web Fonts
Google Web Fonts is a collection of hundreds of free, open-source fonts optimized for the web.
HTML5 Gallery has built-in support for Google Web Fonts, so you can use the stylish free fonts for the title text display.
To use Google Web Fonts, on Google Web Fonts, click Start Choosing Fonts, browse and select a font.
You can then use parameter googlefonts to include the font to the gallery. For example, data-googlefonts="Armata" will load the web font Armata. You can then use the font name in the titlecss parameter: data-titlecss=" {color:#ffffff; font-size:16px; font-family:Armata, sans-serif, Arial; overflow:hidden; white-space:nowrap;}".
If you are going to load multiple fonts, you can seperate each font with |. For example, data-googlefonts="Dosis|Berkshire+Swash" will load two fonts Dosis and Berkshire Swash
Watermark Branding
The Free Version comes with HTML5Box.com logo. The Commercial Version is free from HTML5box.com log and you can also use an image file as your own logo.
The following code will add the image as the watermark: data-watermark="http://html5box.com/images/html5boxlogo.jpg". The watermark can be a JPEG, JPG, PNG, GIF image file, it will be displayed on the top left corner of the gallery.
Customize Default Skin
Apart from parameters defined in sections of 5. Skin, Size and Background, 6. Setup Auto Slideshow and Play Randomly, 9. Image and Video Toolbox, 10. Carousel and Thumbnails, 11. Title, there are several parameters only related with Default Skin.
| Name | Description | Default value |
|---|---|---|
| carouselbgcolorstart | the start color of carousel background gradient | #494f54 |
| carouselbgcolorend | the end color of carousel background gradient | #292c31 |
| carouselbgimage | caroubel background image | "" The image must be placed inside the folder |
| carouseltopborder | color of carousel bar top border | #666666 |
| carouselbottomborder | color of carousel bar bottom border | #111111 |
Customize Vertical Skin
Apart from parameters defined in sections of 5. Skin, Size and Background, 6. Setup Auto Slideshow and Play Randomly, 9. Image and Video Toolbox, 10. Carousel and Thumbnails, 11. Title, there are several parameters only related with Default Skin.
| Name | Description | Default value |
|---|---|---|
| carouselposition | position of carousel bar | right There are two options: |
| thumbshowimage | show image | true |
| thumbshowtitle | show title on thumbnail | true |
| thumbtitlecss | title css on thumbnail | "{text-align:center; color:#ffffff; font-size:12px; font-family:Armata, sans-serif, Arial; overflow:hidden; white-space:nowrap;}" |
| carouselbgcolorstart | the start color of carousel background gradient | #494f54 |
| carouselbgcolorend | the end color of carousel background gradient | #292c31 |
| carouselbgimage | caroubel background image | "" The image must be placed inside the folder |
| carouseltopborder | color of carousel bar top border | #666666 |
| carouselbottomborder | color of carousel bar bottom border | #111111 |
| carouselhighlightbgcolorstart | the start color of carousel background gradient on highlight | #999999 |
| carouselhighlightbgcolorend | the end color of carousel background gradient on highlight | #666666 |
| carouselhighlightbgimage | caroubel background image on highlight | "" The image must be placed inside the folder |
| carouselhighlighttopborder | color of carousel bar top border on highlight | #cccccc |
| carouselhighlightbottomborder | color of carousel bar bottom border on highlight | #444444 |
Customize Light Skin
Apart from parameters defined in sections of 5. Skin, Size and Background, 6. Setup Auto Slideshow and Play Randomly, 9. Image and Video Toolbox, 10. Carousel and Thumbnails, 11. Title, there are several parameters only related with Default Skin.
| Name | Description | Default value |
|---|---|---|
| slideshadow | show shadow around image display area | true |
| thumbshadow | show shadow around thumbnail | true |
| carouselbgcolorstart | the start color of carousel background gradient | #ffffff |
| carouselbgcolorend | the end color of carousel background gradient | #ffffff |
| carouselbgimage | caroubel background image | "" The image must be placed inside the folder |
| carouseltopborder | color of carousel bar top border | #ffffff |
| carouselbottomborder | color of carousel bar bottom border | #ffffff |
Customize Horizontal Skin
Apart from parameters defined in sections of 5. Skin, Size and Background, 6. Setup Auto Slideshow and Play Randomly, 9. Image and Video Toolbox, 10. Carousel and Thumbnails, 11. Title, there are several parameters only related with Default Skin.
| Name | Description | Default value |
|---|---|---|
| galleryshadow | show shadow around whole gallery | true |
| carouselbgcolorstart | the start color of carousel background gradient | #494f54 |
| carouselbgcolorend | the end color of carousel background gradient | #392c31 |
| carouselbgimage | caroubel background image | "" The image must be placed inside the folder |
| carouseltopborder | color of carousel bar top border | #555555 |
| carouselbottomborder | color of carousel bar bottom border | #ffffff |
Mediapage Skin
By adding a data tag data-skin="mediapage" you can create a gallery with multiple-row thumbnails.
| Name | Description | Default value |
|---|---|---|
| thumbrowgap | gap between rows | 16 |
| thumbwidth | width of thumbnail | 120 |
| thumbheight | height of thumbnail | 60 |
| thumbgap | gap between columns | 10 |
| thumbshowtitle | whether to display title under the thumbnail | true |
| thumbtitleheight | height of thumbnail title | 24 |
| thumbtitlecss | title CSS | {text-align:center; color:#000; font-size:12px; font-family:Armata,Arial,Helvetica,sans-serif; overflow:hidden;} |
Events
Event supported by HTML5 Gallery:
onchange: The event will be be fired on changing the slide.
onvideoend: The event will be be fired when the video playing ends.
onthumbover: The event will be be fired when the mouse moves over the thumbnail.
onthumbclick: The event will be be fired when a thumbnail is clicked.
onslideshowover: The event will be be fired when the mouse moves over the slideshow.
The demo codes are as following. data is the data array of current slide object, the definition is [index, Thumbnail address, File address, File address for video ogg file, Fire address for video webm file, Link address, Link target, Title, Description, Type, Width, Height].
<script language="JavaScript">
    function onSlideChange(data) {
        try {
           console.log(data);
        } catch (error)   {}
    }
</script>
<div class="html5gallery" data-width="480" data-height="270" data-onchange="onSlideChange" style="display:none;">
    <a href="images/Trees_large.jpg"><img src="images/Trees_small.jpg" alt="Trees"></a>
    <a href="images/Island_large.jpg"><img src="images/Island_small.jpg" alt="Island"></a>
    <a href="images/OperaHouse_large.jpg"><img src="images/OperaHouse_small.jpg" alt="Opera House"></a>
</div>
Connect With Us

Services
Skins
Products